Title here
Summary here
Are you working on a RESTful API call in your Mendix application? Chances are that it requires OAUTH 2.0 authorization. Read this how-to and get started with your implementation!
To use resources from APIs such as Adobe Sign, Typeform, Google, Rabobank, Twitter, Oracle, Dropbox, your Mendix app must get an access token and attach that token to requests it sends. A common flow used by Web apps is the OAuth 2.0 authorization code grant flow. This post walks through an example using this flow.
The following are the basic steps to use the OAuth 2.0 authorization code grant flow to get an access token from the API provider.
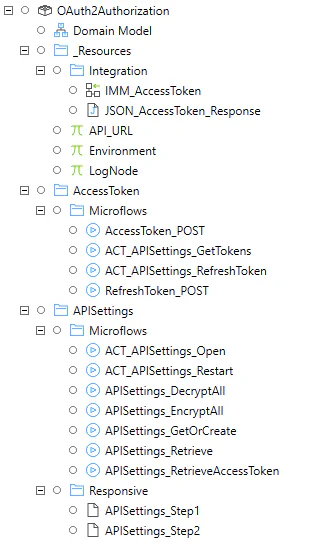
Should you get stuck during any of the implementation steps, please take a look at the OAuth 2 Authorization - example module. It can be used as a reference implementation.
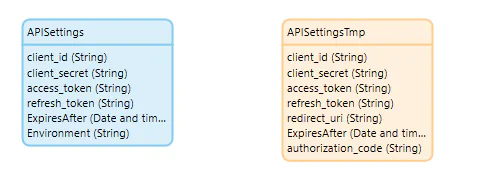
To you use the API endpoints, you must first register your app using the developer/admin portal of the resource provider. To configure an Mx app to use the OAuth 2.0 authorization code grant flow, save the following values when registering the app:
For more detailed steps on how to register an app in the portal look at the developer documentation of the API provider.
The client credentials (client_id & client_secret) need to be persisted in the Mendix application. These credentials should remain confidential. To store this securely I chose to encrypt this data and use a non-persistent entity to edit and display the decrypted values. The entity will store the client credentials and other information used in the OAuth flow.
In the traditional API security model the Mendix application would request data on the API by authenticating with the API through credentials (typically username+password). This created several problems and limitations. OAuth 2.0 addresses these issues by introducing a framework which grants access on behalf of a user. The application uses an access token instead of the credentials of the user.
To get an access token the user needs to be redirected to the authorization server of the provider. The user will need to sign in and is asked to consent for the permissions your Mendix app requests. The authorization server will return an authorization_code that can be used to obtain an access token.
Permissions are requested using the scope parameter. In this example, the requested permissions are forms:read, responses:read, which will allow the Mx app to read the forms and the responses via the Typeform API. The offline_access permission is requested so that the app can get a refresh token. The app can use the refresh token to get a new access token when the current one expires. Each API provider might have slightly different versions of the authorization request.
// Line breaks for legibility only

https://api.typeform.com/oauth/authorize?
client_id=321DANmzjap4hLVmSeTJ9tasda8
&redirect_uri=https://your-mx-app.com/callback
&scope=offline+forms:read+responses:read
&state=xyz789| Parameter | Description |
|---|---|
| client_id | The application id the developer/admin portal assigned your app. |
| redirect_uri | URL where the application should redirect after users log in and grant access. Is also checked when using callbacks |
| scope | Space-delimited list that identifies the extent of access that your application requires. |
| state | Value you can include to help prevent cross-site request forgery (XSRF) attacks. |
This step is performed in the browser and requires no implementation in Mendix.
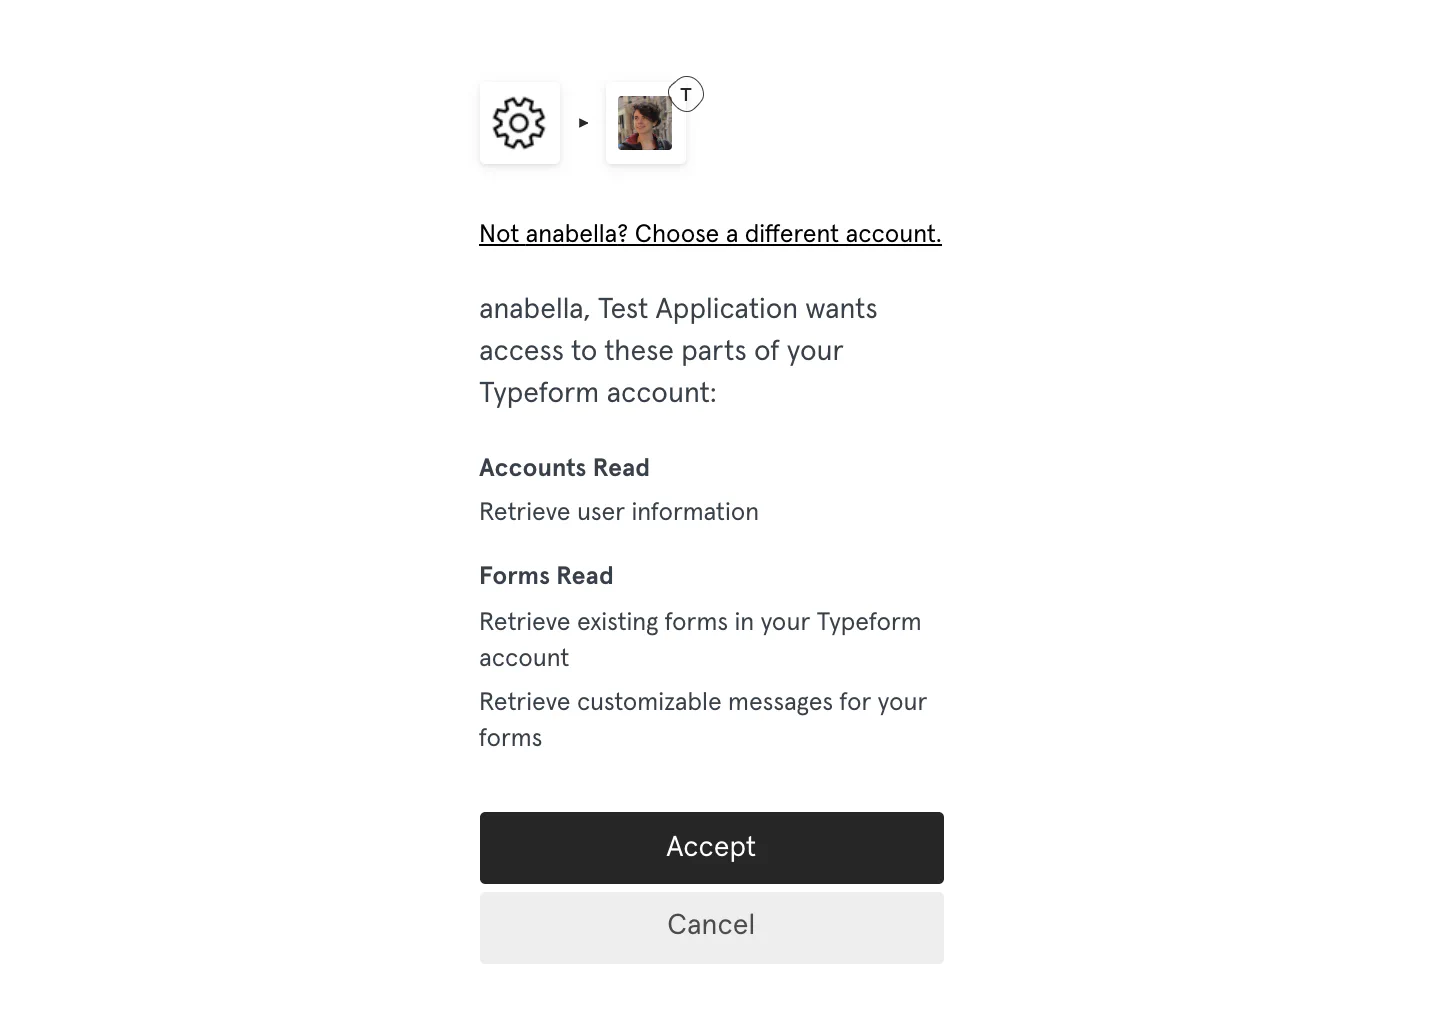
After accessing the url via the browser, the user will be asked to enter their credentials to authenticate with the server. After sign in the user is asked to consent to the permissions indicated in the scope query parameter.
The following screenshot is an example of the consent dialog box presented to a Typeform user.
After consent of the user, the authorization server response will contain the authorization code. Usually the authorization_code is set in the code parameter in the redirect URL.
https://your-mx-app.com/callback?
code=M0ab92efe-b6fd-df08-87dc-2c6500a7f84d
&state=xyz789
The authorization_code is short lived. The Mendix app can use the authorization code to request an access token for the target resource.
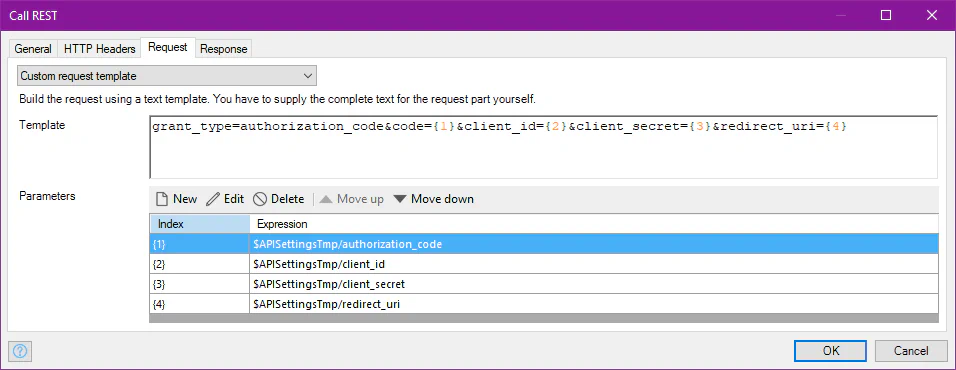
You use the authorization_code received in the previous step to request an access token by sending a POST request to the /token endpoint.
// Line breaks for legibility only

POST https://api.typeform.com/oauth/token
Content-Type: application/x-www-form-urlencoded // headers

grant_type=authorization_code
&code=M0ab92efe-b6fd-df08-87dc-2c6500a7f84d
&client_id=G2ecaFi45AFLMRxADsWKCNEqwMTVjxbAQ4oUBdrjagnf
&client_secret=AjK4PhyuaSXjFHvA4wzXJNqd2GjFTbVeZ4wUao2cL4y1
&redirect_uri=https://your-mx-app.com/| Parameter | Description |
|---|---|
| grant_type | Must be authorization_code for the authorization code flow. |
| code | The authorization_code that you acquired in the previous step. |
| client_id | The application id the developer/admin portal assigned your app. |
| client_secret | The client secret that you created in the portal for your app. |
| redirect_uri | The same redirect_uri value that was used to acquire the authorization_code. |
The authorization server will verify the access token request. If everything is OK, it will send an access token to the application in a JSON response
{
   "access_token":"2YotnFZFEjr1zCsicMWpAA",
   "token_type":"example",
   "expires_in":3600,
   "refresh_token":"tGzv3JOkF0XG5Qx2TlKWIA",
   "example_parameter":"example_value"
}| Parameter | Description |
|---|---|
| access_token | The requested access token. |
| token_type | Indicates the token type value, usually Bearer |
| expires_in | How long the access token is valid (in seconds). |
| refresh_token | Your Mx app can use this token to acquire a new access token after the current access token expires. |
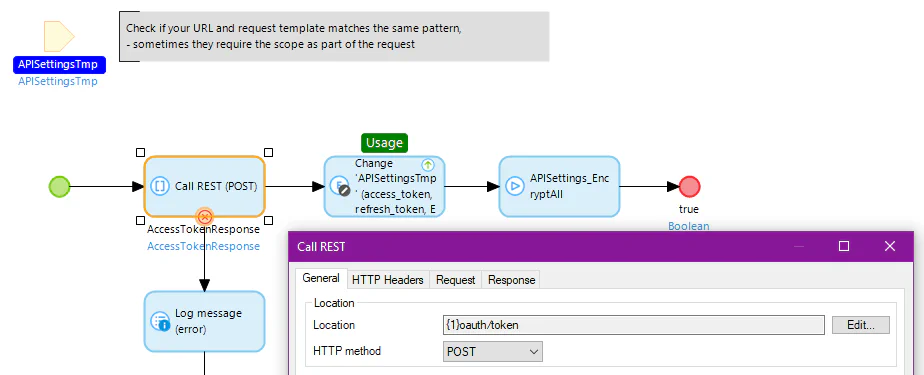
Follow the steps to consume a REST service and call it in a Microflow.
Store the response with the tokens in the API Settings entity and calculate the ExpiresAfter date based on the currentDateTime and the expires_in value.
Your application is ready to integrate with all the resources defined within the scope.
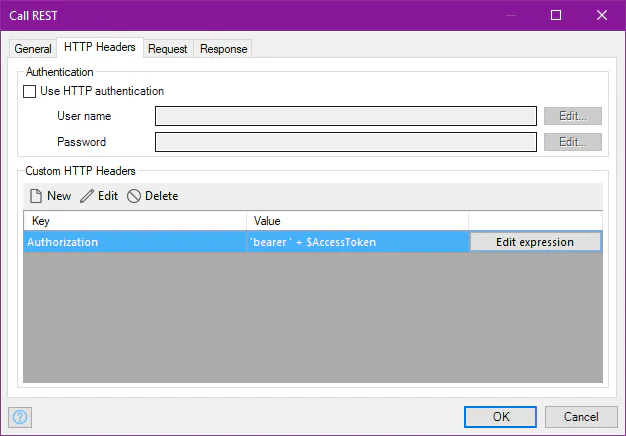
The access token needs to be in each REST request header.
Access tokens are short lived, and you must refresh them after they expire to continue accessing resources. Acquire a new access token by submitting another POST request to the /token endpoint. This time using the refresh_token instead of the authorization_code.
// Line breaks for legibility only

POST https://api.typeform.com/oauth/token
Content-Type: application/x-www-form-urlencoded // headers

grant_type=refresh_token
&refresh_token=tGzv3JOkF0XG5Qx2TlKWIA
&client_id=G2ecaFi45AFLMRxADsWKCNEqwMTVjxbAQ4oUBdrjagnf
&client_secret=AjK4PhyuaSXjFHvA4wzXJNqd2GjFTbVeZ4wUao2cL4y1
&scope=offline+forms:read+responses:read
&redirect_uri=https://your-mx-app.com/
The grant_type parameter in the REST call with a refresh token must be refresh_token with the value of the earlier obtained refresh token.
A successful token response will look similar to the access token response. The only difference is that this response will always include a refresh_token.
The refresh token is also a consumed POST REST service call. The implementation is nearly identical to the access token request, only the request parameters are different.
Make sure to replace the old access AND refresh token with the newly acquired tokens. Consider a scheduled event to refresh access token to ensure your refresh tokens remain valid for as long as possible and no human interaction is required.
You have connected your Mendix app to an API with the Auth 2.0 authorization code grant flow. Check the app explorer example below to see if you missed any implementation steps.